Running Vitis AI with the Kria Starter Kit
Try Using Model Zoo
Release date: Feb 22, 2023
Xilinx provides Model Zoo, a collection of numerous AI models.
Model Zoo provides the relevant source code for each AI model, as well as pre-compiled AI models for the board.
In this article, we will try to perform AI inference for image classification using the pre-compiled AI model for KV260 as is.
The model to be used will be tf_inceptionresnetv2_imagenet_299_299_26.35G_2.5 in No. 1 of the Model Zoo classification.
It is assumed that Environment setup 1 and Environment setup 2 have already been performed.
Table of Contents
AI Inference Overview of KV260
The KV260 uses a Deep Learning Processor Unit (DPU) for AI inference.
DPU is a programmable engine and contains various modules such as convolutional operations.
Please refer to the Zynq UltraScale + MPSoC DPU for details.
The KV260 uses DPUCZDX8G and has architectures B512, B800, B1024, B1152, B1600, B2304, B3136, and B4096.
The AI model must be compiled according to the architecture of the DPU applied to the board, and if the AI model architecture is different, an error will occur when executing AI inference.
When you boot the Petalinux Image guided in Environment Setup 1, the B4096 architecture is applied.
AI models distributed by Model Zoo are also compiled with B4096, so they can be used as-is for AI inference.
Overview of the AI model to be used
The AI model used in this article is an AI model for image classification using the ImageNet dataset.
Specifically, the AI model outputs each probability of 1000 types (strictly speaking, 1001 types including Background) for an input image of size 299x299.
AI inference can produce results such as "there is a 95% probability that the input image is an airplane".
Download Model Zoo
Work under the model_zoo directory in the Vitis-AI source code.
The AI model can be downloaded from either the host PC or the Vitis-AI development environment, but for the purposes of this article, we will use the Vitis-AI development environment.
On the host PC, go to the Vitis-AI source code directory and execute the following to start the Vitis-AI development environment
user@hostpc:~$ ./docker_run.sh xilinx/vitis-ai-cpu:latestDownload the target AI model by executing the following in the Vitis-AI development environment
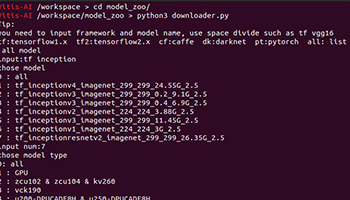
- Go to the model_zoo directory
- Run downloader.py, the download script
- Enter tf inception to narrow down the target AI model
- Enter the number of tf_inceptionresnetv2_imagenet_299_299_26.35G_2.5
- Enter numbers zcu102 & zcu104 & kv260
- Extract the downloaded inception_resnet_v2_tf-zcu102_zcu104_kv260-r2.5.0.tar.gz
- Exit the Vitis-AI development environment with exit
The inception_resnet_v2_tf.xmodel in the unzipped directory is the compiled AI model for KV260 used in this article.
The screenshot of the above download procedure is included for reference.
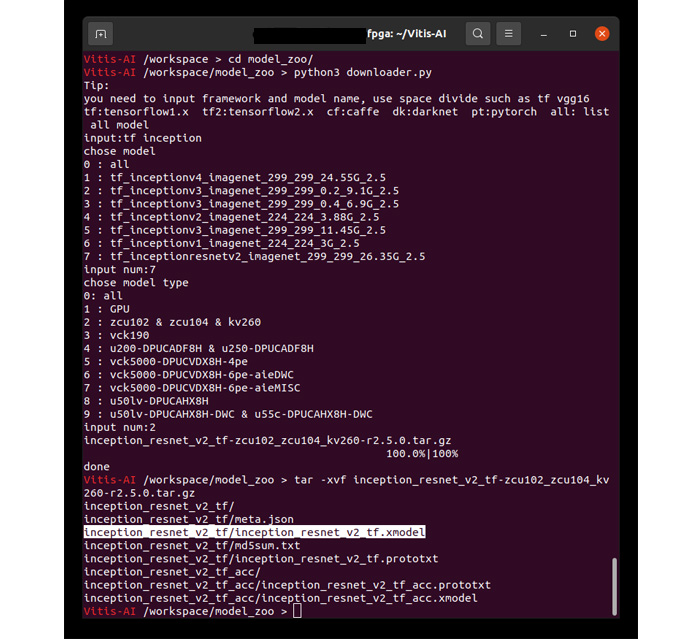
Download procedure (click to enlarge)
Download the files used in this article
Download Jupyter Notebook, label files, and test images for AI inference with KV260.
Please download the file below.
The contents are as follows
| file-name | Description. |
|---|---|
| Vitis-AI_test.ipynb | Jupter Notebook file to perform AI inference |
| imagenet_label.txt | Correspondence table between number of outputs and image type (label file) |
| test.jpg | test image |
How to use Vitis-AI Library
Before running the AI inference, an overview of how to use AI models with the Vitis-AI library is provided.
A detailed description can be found in the Vitis-AI information.
APIs are provided in C++ and Python.
The modules used for AI inference on the KV260 are
- XIR(Intermediate Representation)
- Vitis-AI Library
This article uses Python. An overview of how to use the system is below.
The same usage applies when using other than inception_resnet_v2_tf.xmodel.
You will see that the Vitis-AI library enables AI inference with short code without deep knowledge of FPGAs.
# import required modules
import xir
import vitis_ai_library

# Load (deserialize) AI model
g = xir.Graph.deserialize("inception_resnet_v2_tf.xmodel")

# Create AI inference execution instance
runner = vitis_ai_library.GraphRunner.create_graph_runner(g)

# Prepare for input/output
inputData = runner.get_inputs()
outputData = runner.get_outputs()

# AI inference execution, waiting for job completion
# inputData : Set input data to AI inference.
# outputData : AI inference results are stored.
job_id = runner.execute_async(inputData, outputData)
runner.wait(job_id)
Preparing the startup microSD card
Prepare the microSD cards created in Environment Setup 1 and Environment Setup 2.
Deployment of AI inference files
Place the four files obtained in Section 3.1 on the microSD card.
| file-name | Description. |
|---|---|
| inception_resnet_v2_tf.xmodel | AI model provided by Xilinux |
| Vitis-AI_test.ipynb | Jupter Notebook file to perform AI inference |
| imagenet_label.txt | Correspondence table between number of outputs and image type (label file) |
| test.jpg | test image |
The method of placement is optional, but this article will show you how to copy it on the host PC and how to transfer it via scp.
Please place them at your convenience.
When copying on the host PC
Connect the microSD card to the host PC.
We will output to /media/[username]/root/home/petalinux.
user@hostpc:~$ cp inception_resnet_v2_tf.xmodel /media/[username]/root/home/petalinux
user@hostpc:~$ cp imagenet_label.txt /media/[username]/root/home/petalinux
user@hostpc:~$ cp Vitis-AI_test.ipynb /media/[username]/root/home/petalinux
user@hostpc:~$ cp test.jpg /media/[username]/root/home/petalinux
user@hostpc:~$ sync
Connect the microSD card to the KV260.
When transferring by scp
Connect the microSD card to the KV260 and activate it. Keep the KV260 and the host PC connected on the same network.
We will output to /home/petalinux.
user@hostpc:~$ scp inception_resnet_v2_tf.xmodel petalinux@[KV260's IP]:/home/petalinux
user@hostpc:~$ scp imagenet_label.txt petalinux@[KV260's IP]:/home/petalinux
user@hostpc:~$ scp Vitis-AI_test.ipynb petalinux@[KV260's IP]:/home/petalinux
user@hostpc:~$ scp test.jpg petalinux@[KV260's IP]:/home/petalinux
Jupyter Notebook Preparation
KV260 side work
Connect the microSD card to the KV260 and start it up.
Access KV260 via serial connection and start Jupyter Notebook.
cd /home/petalinux
jupyter notebook
Host PC side work
Access http://[KV260's IP]:8888 in your browser.
Image.
- Vitis-AI_test.ipynb
- imagenet_label.txt
- inception_resnet_v2_tf.xmodel
- test.jpg
is displayed, it is OK.
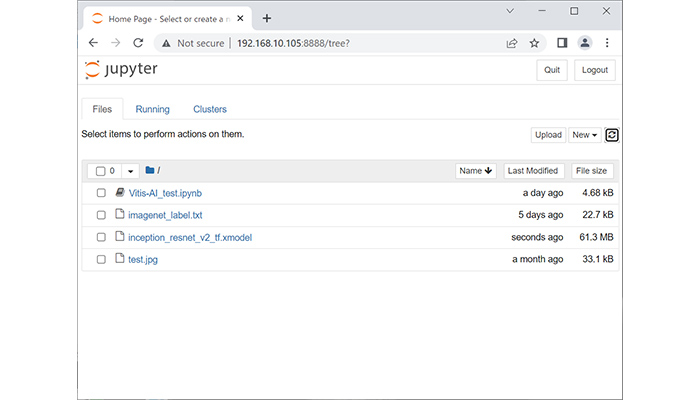
Browser screen (click to enlarge)
Example of AI Inference Execution
Now that we are ready to try AI inference with the KV260, let's run AI inference in Python.
Execution takes the form of executing each cell in Jupyter Notebook.
In a browser on the host PC, select Vitis-AI_test.ipynb in Jupyter Notebook.
The AI Inference Notebook will be displayed. Press the Run button from the first cell to the last cell.
It is operated on the host PC, but it is KV260 that is executing the operation.
Please confirm that the execution results look like the following image (output results of processing time will vary).
I think we can confirm that the AI inference can be performed and correctly determine the correctness of the image of the airplane as input.
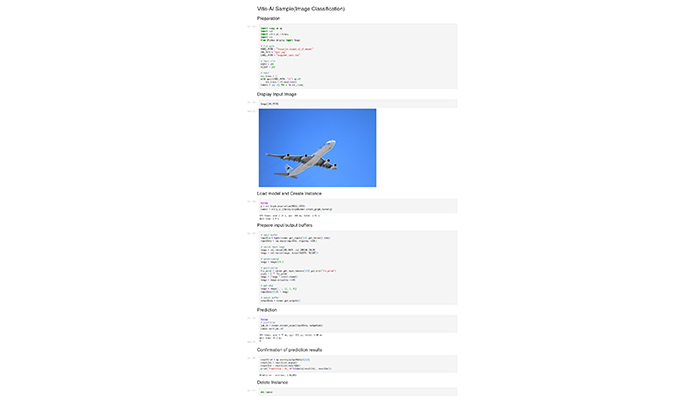
Example of AI inference execution (click to open directly)
The test image is optional, so you can replace it with any image you like and display the results.
You can transfer files from the host PC to KV260 by pressing the Upload button on the right side of Jupyter's file list page.
summary
AI inference was performed on the KV260 using a trained AI model provided by Xilinx.
With the Vitis-AI library, we were able to confirm that AI inference can be performed on the KV260 with short code.
Since many AI models are provided by Model Zoo, it would be possible to check the same with other AI models.
However, the input/output format of the AI model and the processing of the output results must be implemented after checking the contents.
* All names, company names, product names, etc. mentioned herein are trademarks or registered trademarks of their respective companies.
